
API v1
The 1.0 API is deprecated.
This simple guide will help get a sample API client up and running.
Pre-Authorization Steps
Getting an App Id
An app id is needed to authorize your application with the ReadyCloud API. Please follow the steps below in order to obtain one.
Go here and create an app. Name it whatever you like, but make sure it relates to the application that you will be authorizing with. For example, if an application were named “BurgerMaker”, “BurgerMaker Client” would be a suitable name.
Creating a URL
The next step is to create a URL that your application will use to authenticate with ReadyCloud.
The base URL is this:
And it accepts the following GET query string parameters:
- response_type: MUST be set to “token”. This argument is required.
- scope: Space separated permissions to API resources that your application is requesting to access from the RC account user. If omitted, all scopes below will be requested (not recommended). You can ask for full or read only access.
- client_id: This is the App Id that we got from the Getting an App Id section above.
An example of a complete URL is the following:
Available scopes
The following scopes are available:
account or account-read_only to access:
order or order-read_only to access:
company or company-read_only to access:
packaging or packaging-read_only to access:
Authorizing Your Application
Getting an access token
If you created the above URL correctly, it should bring you to a page like this, assuming you are logged in at www.readycloud.com:
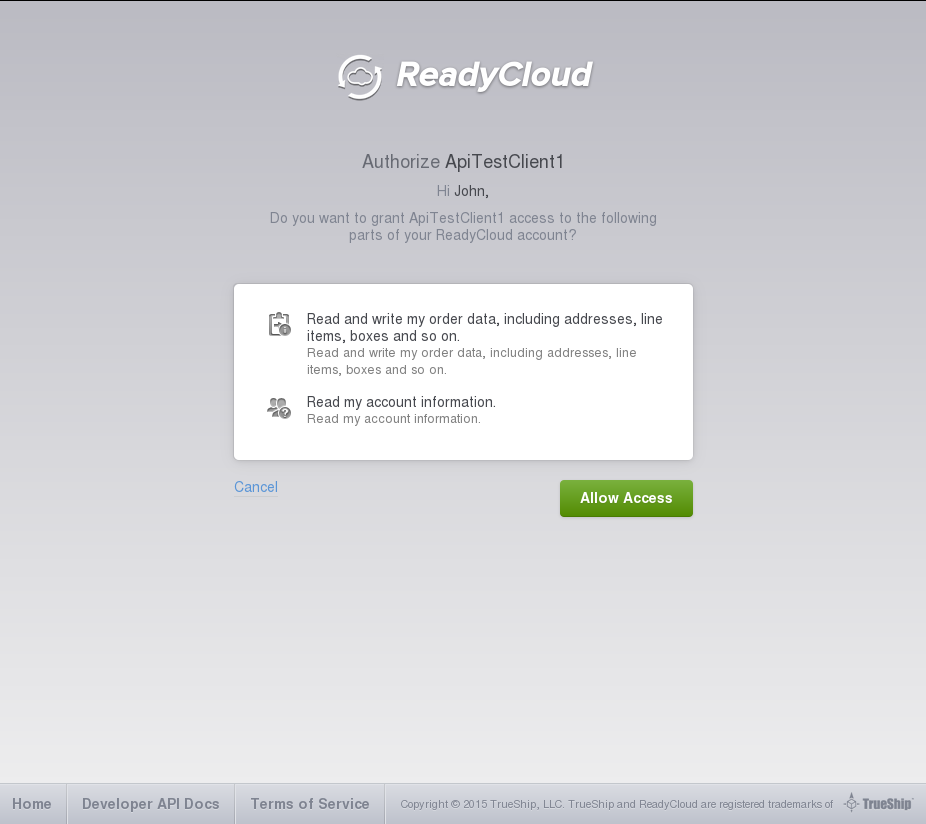
This is the screen that the user who clicked the URL you created will see. If they agree to allow your application to access the parts of their account you requested and click the “Allow” button, they will be redirected to the redirect URI that you provided while creating your new app. An access_token parameter will be appended to the URL as a hash fragment, so you can process it programmatically in your application.
If you didn’t provide a redirect URI, the user will be shown a page with the access token on it for manual entry. An example of the URL of the displayed page is:
Instruct them to copy the token into your application. At that point, your application will need to save the token in order to access the ReadyCloud APIs without needing to authenticate again.
If you are writing a mobile application and you are in control of the web browser, you can automatically capture the token from the URL fragment of the default redirect URI. This way the user does not need to manually enter it. The access token in the URL above is the access_token fragment parameter.
Getting an access token without copy and paste
When you register your app you can optionally choose to provide a custom redirect URL. This URL would point to a page on your servers where you want customers who successfully authenticated to be sent.
Since the page is on your server, and since the access token is provided as a URL fragment as described above, you can quietly capture the token without showing it to the user or asking the user to copy and paste anything.
Once you have captured it you can redirect the user to a page to finalise the ReadyCloud integration or to show a custom success message.
Please note that we review all custom redirect URLs for security purposes. This is just a quick check to make sure customers who have invested their trust in us and ReadyCloud are not redirected by us to some surprising location. If you do specify a custom redirect URL, your newly created app will be placed in a review queue and there will be a delay before you can proceed.